
Technical article. Written for readers who want the building science. Prefer the short version? Browse the Homeowner Guides.

Key takeaways
- Supply leaks send cooled air into the attic and return leaks pull 150°F attic air into the system; together they can cut effective capacity by 25 to 40 percent in severe cases.
- A 10 percent return leak on a 5-ton system adds about 1.4 tons of load on its own, and a 15 percent supply leak delivers only 85 percent of the cooling to the rooms.
- Leaks come from disconnected and failed flex ducts, unsealed return plenums, collars and wye fittings, metal duct seams, register cans and older equipment cabinets, and they grow as the duct materials age.
- A duct blaster test, flow hood measurements and thermal imaging quantify and locate the leakage. Cloth duct tape, more refrigerant and new equipment do not fix leaky ducts.
Summertime temperatures are extreme in the Desert Southwest. The HVAC systems in many homes are unable to maintain the temperature at the thermostat set point during the afternoon heat. This leads to comfort problems inside the home. If the HVAC system continues to struggle to recover after the sun goes down, the comfort problems are amplified because it becomes difficult for home occupants to sleep.
Cause: Excess Duct Air Leakage
One cause of this problem is air leakage in the duct system. When supply ducts leak, conditioned air escapes to the attic before reaching the rooms it was intended to cool. When return ducts leak, superheated attic air enters the system, dramatically increasing the heat load the equipment must overcome. In the Southwest’s extreme climate, where attic temperatures exceed 150°F during summer, duct leakage has an outsized impact on system performance.
Why Does Duct Air Leakage Cause Conditioned Air to Escape the Home?
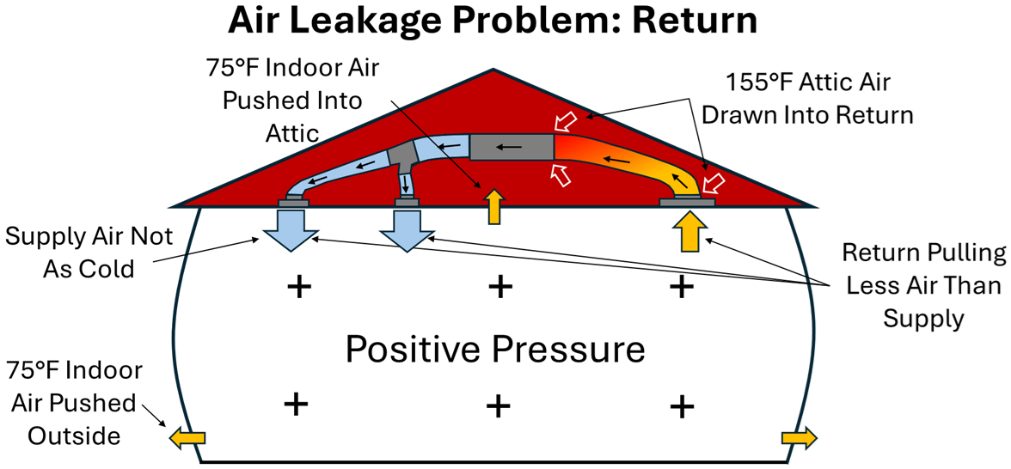
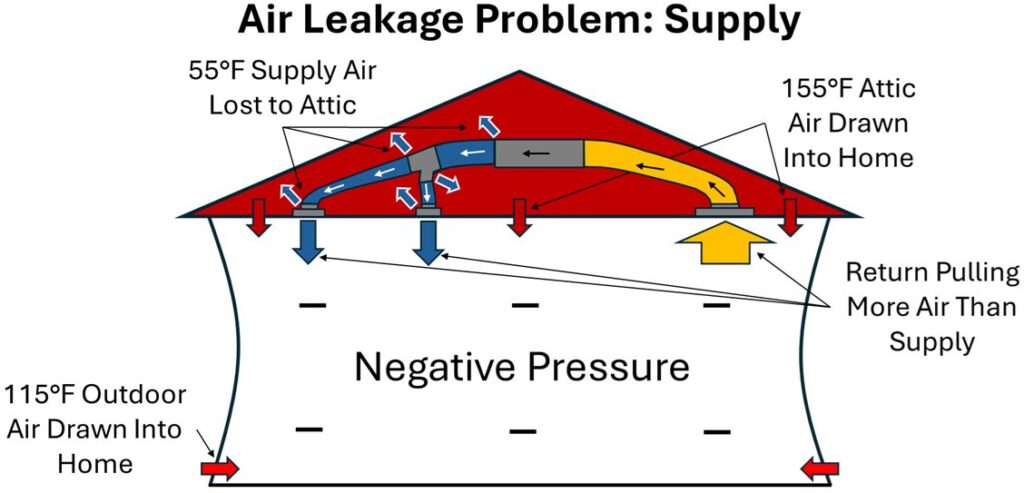
Duct leakage changes both where the air goes and where it comes from. Supply leakage dumps conditioned air into the attic before it reaches the rooms. Return leakage pulls superheated attic air into the return stream (often downstream of the filter). When return leakage is significant, the air handler can deliver more air to the living space than it draws back through the return grilles, pressurizing the home and pushing conditioned air out through envelope leaks; if supply leakage dominates, the home can depressurize and pull in hot attic and/or outdoor air.¹
No home is airtight, so any duct-induced pressure imbalance is relieved through leakage paths in the building envelope. In the summer, attic air is often much hotter than outdoor air. Return leaks are especially punishing because they mix 150°F+ attic air into the return stream, raising the entering-air temperature at the coil and increasing the heat the equipment must remove before it can cool the living space effectively.
Supply duct leakage wastes conditioned air directly. Air that was cooled to 55°F at considerable energy expense escapes into the attic rather than being delivered to the living space. A system with 15% supply leakage delivers only 85% of its cooling capacity to the rooms. The rest is lost to the attic.
Return duct leakage has an even more severe impact. Consider the sensible heat math (Q ≈ 1.08 × CFM × ΔT): a 5-ton system moves roughly 2,000 CFM. If 10% of that air (200 CFM) enters through return leaks at 155°F instead of through return grilles at 75°F, ΔT is 80°F and the added sensible load is about 1.08 × 200 × 80 ≈ 17,000 BTU/hr, roughly 1.4 tons of load, just from the return leak.²
The combined effect of supply and return leakage can reduce effective system capacity by 25 to 40% in severe cases.
What Are the Sources of Duct Air Leakage?
Return duct leakage comes from a variety of sources.
Disconnected Ducts. Major air leaks are caused by ducts that become disconnected from their fittings. These ducts were typically originally installed with no air sealing or simple duct tape that has subsequently failed.
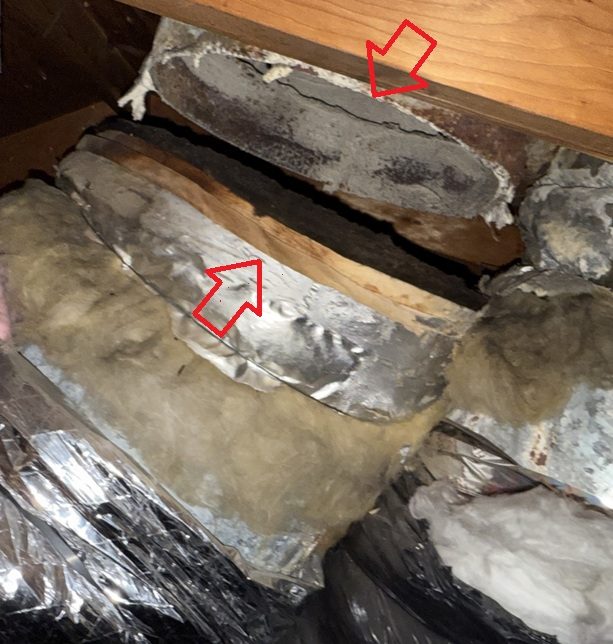
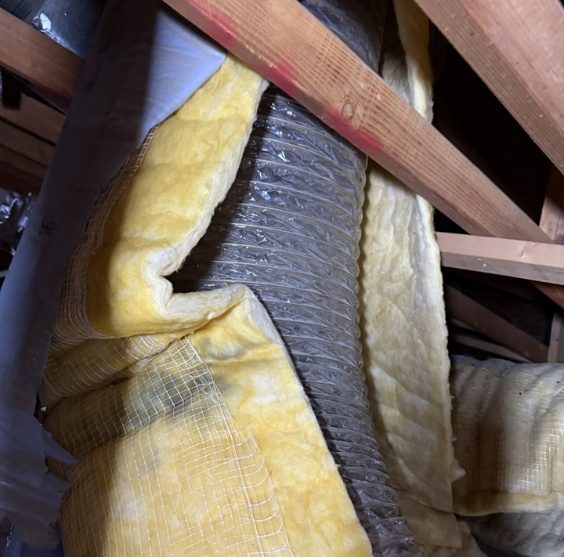
Failed Ducts. Failed ducts are an increasing source of duct leakage. Flex duct is typically manufactured with polyethylene, the same material as plastic garbage bags, which have a limited lifespan. Exposure to extreme attic temperatures and rapid temperature changes during the thousands of heating and cooling cycles each year cause the materials in flex duct to become brittle and fail. As more homes enter the age when their flex ducts fail, this is becoming a significant problem for homes built in the 1980s and 1990s.
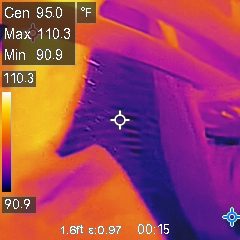
Return Plenum. The return plenum that HVAC contractors attach to the equipment is a common source of air leakage. A return plenum is a box often made of metal, duct board, or another material that receives the return air from the home and delivers the air to the HVAC equipment. The air is pulled from the return plenum by the equipment and depressurizes it. Return trunk ducts are connected to the plenum and deliver air from the interior of the home to the depressurized plenum. If the return plenum is not properly sealed, it will pull in attic air rapidly, as it is the most negative-pressure component of the duct system.⁴
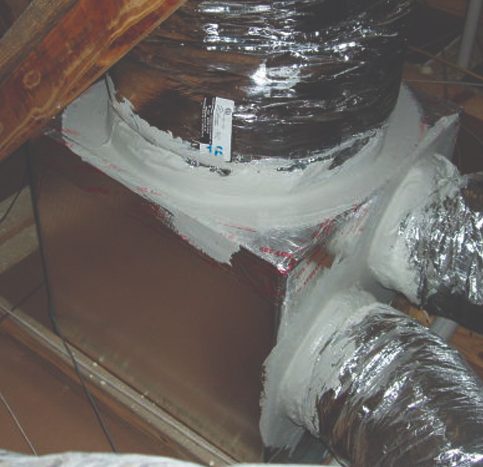
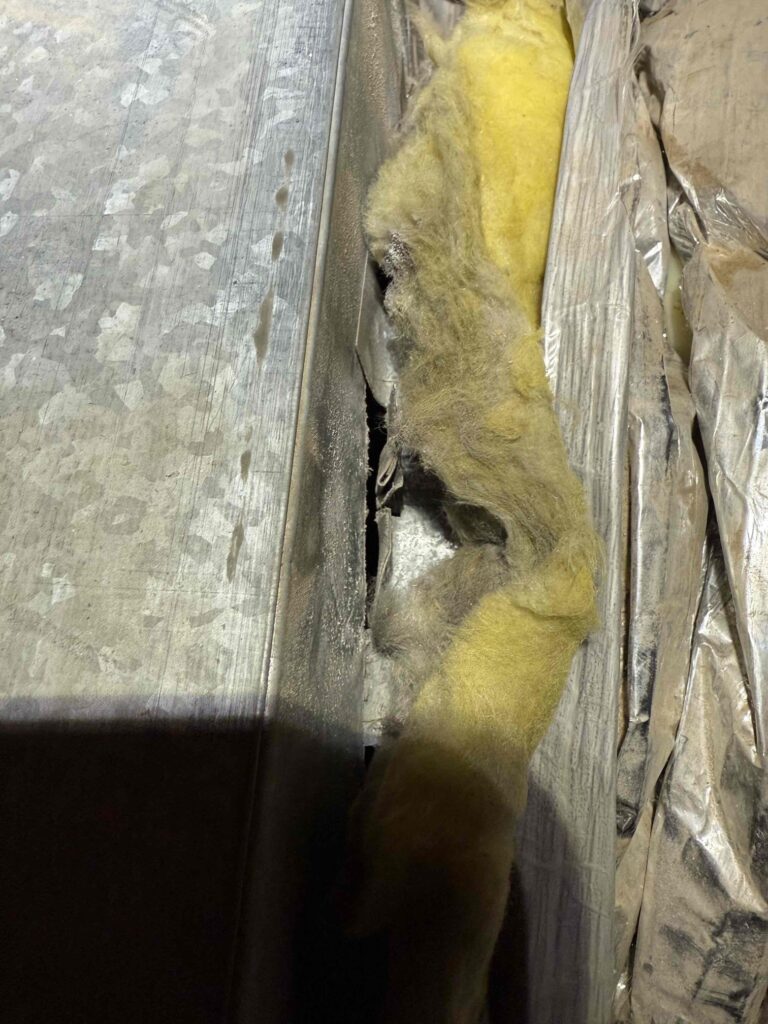
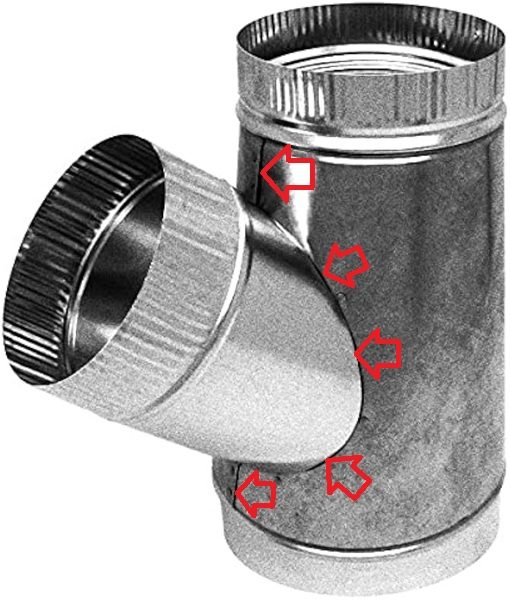
Fittings. Duct fittings are another common source of air leakage. Collars are metal components that are often used to connect trunk ducts to the plenum. If they are not properly sealed at the time of installation, they will leak air.⁵
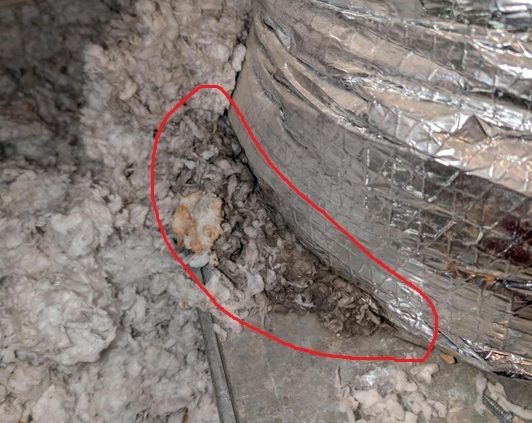
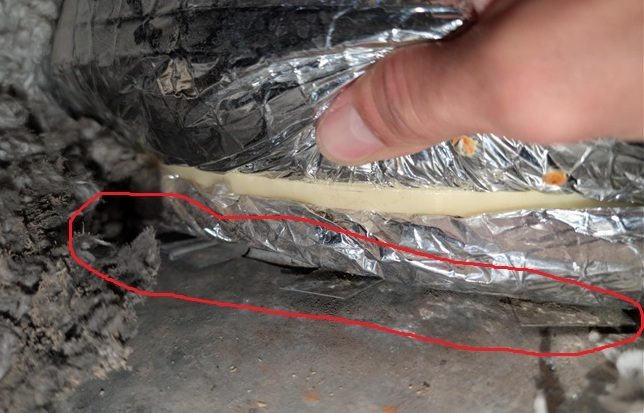
In addition to collars, wye branch fittings are another common source of air leakage. In addition to the wye fitting itself, the duct connections to the wye are often not sealed properly and leak air.
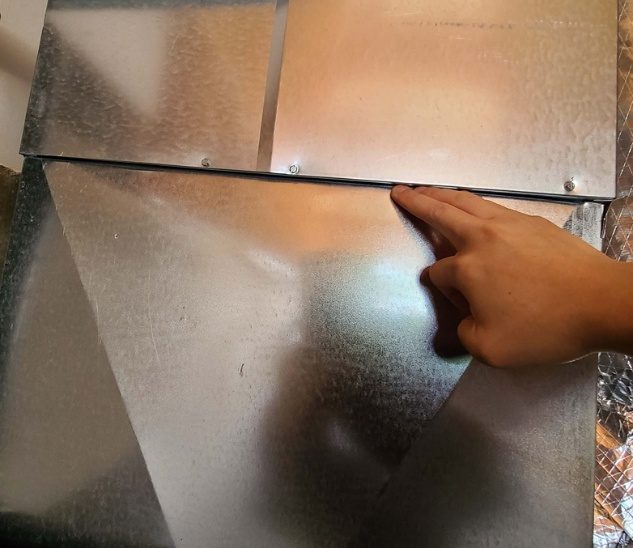
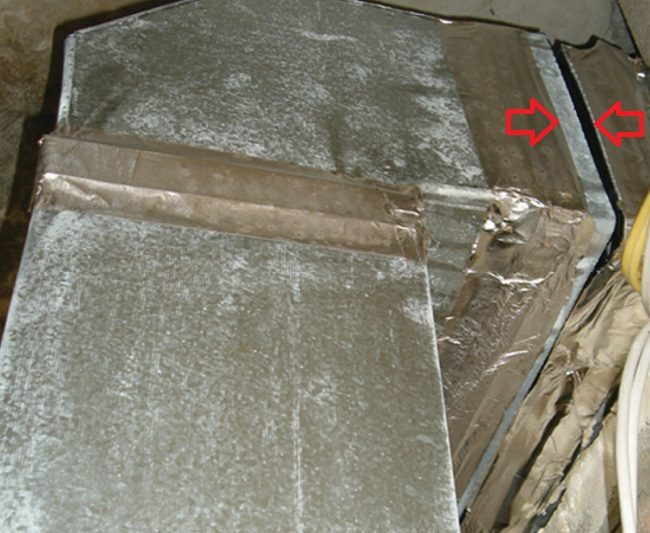
Seams. Many homes, especially those built before the mid-1980s, have metal trunk return ducts. When these ducts were originally installed, they were assembled from several segments that were mechanically fastened together. It was not common practice to seal these seams, leading to many sources of air leakage. Even if the seams were sealed with duct tape or mastic, after years of expansion and contraction during every heating and cooling cycle of the HVAC equipment, the tape will have failed, or mastic cracked and air will leak from every seam.⁶
Register Cans. Register cans or duct “boots” are the components that connect the duct system to conditioned space through drywall (few homes in the Southwest have floor registers). The seams in the register cans themselves, the duct connections, and the interface with the drywall are all common sources of return air leakage.⁷
Equipment Cabinets. The standard for maximum air leakage allowed from HVAC equipment has been lowered to 2% of system airflow in recent years. Older equipment typically has much greater air leakage. Panels, seams, and access doors on the air handler cabinet often leak, particularly in equipment installed before modern airtightness standards.8
Additional Effects of Excess Duct Air Leakage
Beyond capacity loss, duct leakage creates secondary problems that compound over time.
Dust Accumulation. In addition to pulling in excessive attic heat, return duct leakage also draws in attic dust and dirt downstream from the system’s air filter(s). The dust and dirt accumulate on the HVAC equipment blower wheel and evaporator coil.
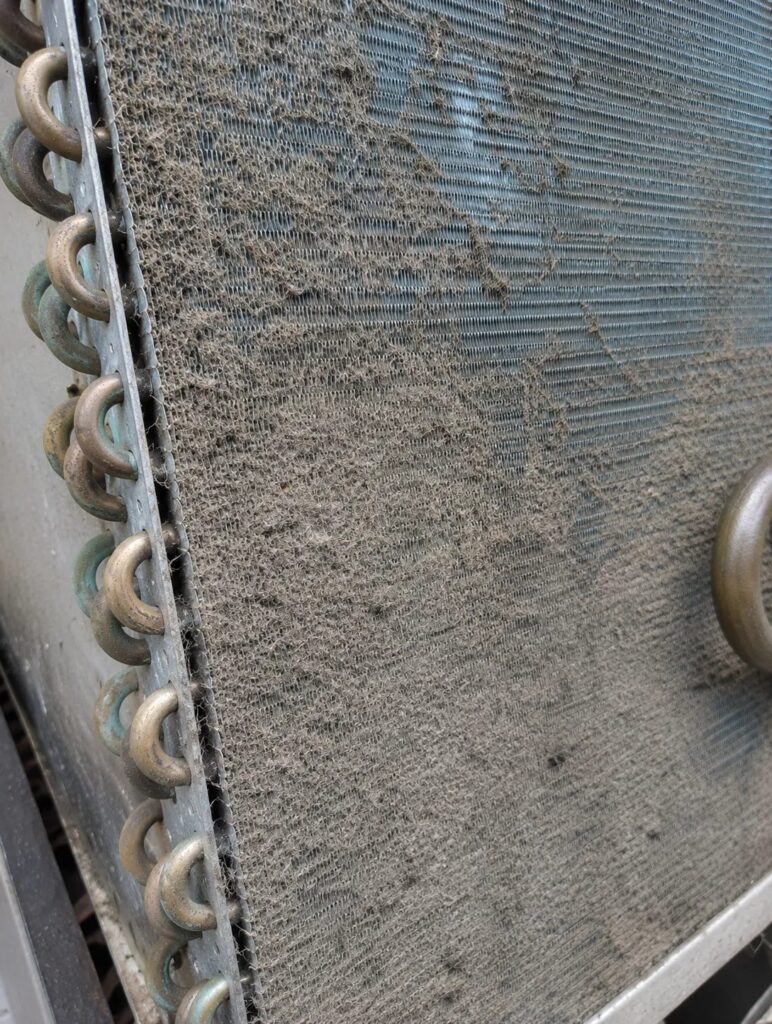
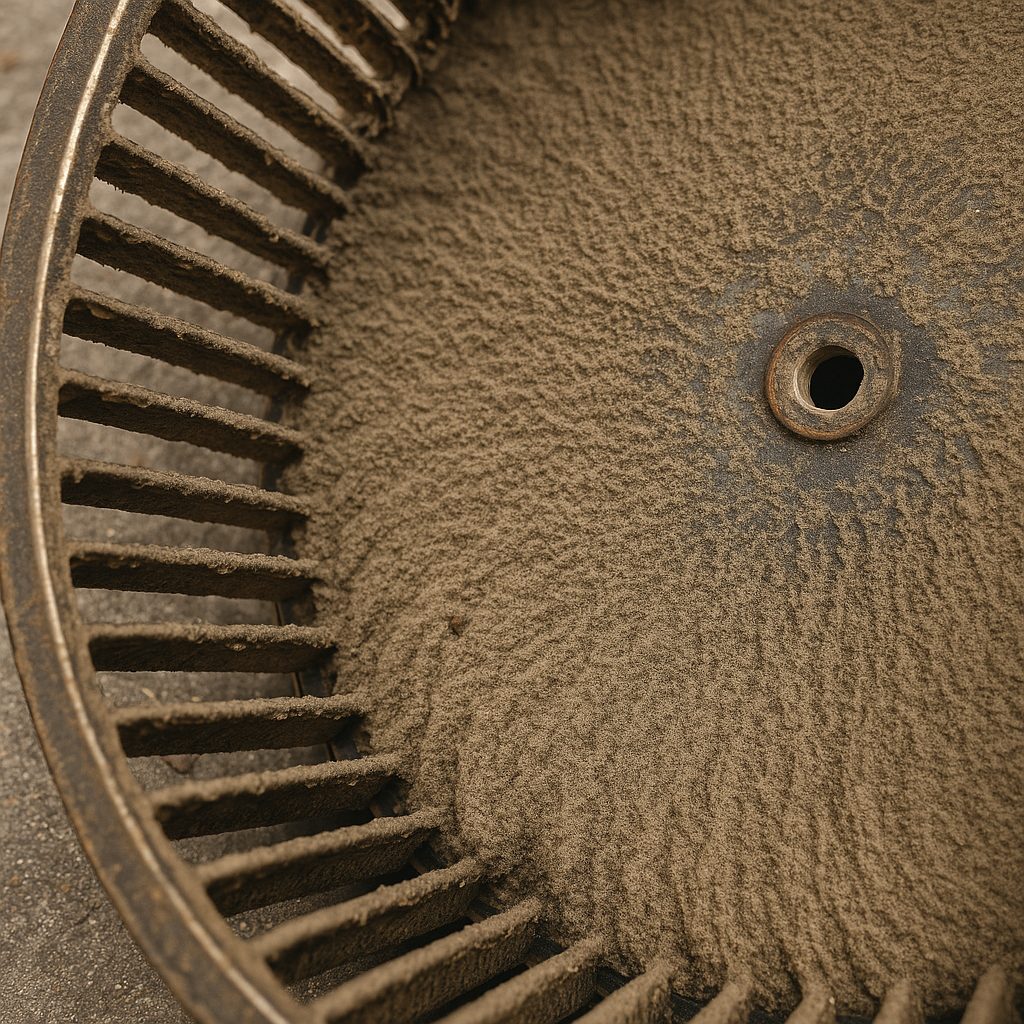
Over time, this accumulated material will restrict the air delivery of the blower and reduce heat transfer to the evaporator coil. Both of these reduce the cooling capacity generated by the HVAC equipment. Standards have been established for how to properly restore the cleanliness of HVAC equipment.⁸
Traditional Duct Installation Practices. Newer homes generally have duct systems installed with additional attention to duct sealing, particularly with the use of mastic. This is because code requires testing of duct leakage. Modern codes specify maximum allowed duct leakage at 4%.
However, homes built before the 2010s were generally not tested for duct leakage, so little attention was paid to long-term duct sealing. If any sealing technique was used, it was typically duct tape. Duct tape adhesive typically fails after a few years in the extreme conditions of Southwest attics. This is why Energy Star research indicates that a typical home in the U.S. has 20% to 30% duct leakage.⁹
Because duct leakage typically increases over time as duct materials degrade, an increasing number of HVAC systems struggle to maintain a comfortable temperature in the home due to duct air leakage.
Building-science research has long noted that placing ductwork in attics exposes it to the most extreme temperatures in the house, which magnifies the penalty of leakage and inadequate insulation. In the Southwest, that means even moderate duct defects can translate into large comfort and efficiency losses.¹⁰
Unfortunately, the vast majority of homes in the Southwest have been built with ductwork located in the attic.
Common Signs of Excess Duct Air Leakage
Homeowners typically notice several indicators when duct leakage is significant:
- System runs constantly but cannot maintain setpoint on hot afternoons
- Supply air at registers feels warmer than expected
- Rooms at the end of duct runs are consistently harder to cool
- Visible dust staining around supply registers
- Blower wheel and evaporator coil are dirty despite regular filter changes
- Home feels drafty or experiences noticeable pressure changes when the system cycles
- Doors move or slam when the HVAC system turns on or off
- Higher than expected utility bills during cooling season
For a plain-language overview of this condition, read the homeowner guide: You’re Paying to Air-Condition Your Attic: Here’s Why.
How Professionals Confirm This Condition
Professionals use multiple methods to identify and quantify duct leakage.
Visual Inspection. Visual inspection of accessible ductwork reveals obvious problems: disconnections, failed flex duct, unsealed joints, and deteriorated tape. However, much of the duct system is typically not visible from normal attic access points, so measurement, testing, and/or thermal imaging is essential.
Airflow & Pressure Measurement. Duct leakage can be measured in five steps. First, measure total external static pressure (TESP) of the indoor blower. Second, look up the airflow output of the blower from the manufacturer’s blower performance table for the measured TESP. Third, determine the supply air leakage by measuring and summing the supply air output of all supply registers with a flow hood and subtracting this value from the airflow value in step 2. Fourth, determine the return air leakage by measuring and summing the return air intake of all return grills with a flow hood and subtracting this value from the airflow value in step 2. Fifth, add the supply air leakage value from step 3 and the return air leakage value from step 4 to determine total duct leakage. This is the duct leakage value for the actual duct system pressure.
Duct Leakage Testing. Duct leakage testing using a duct blaster quantifies total duct leakage. Results are typically expressed as CFM25 (leakage at 25 Pa test pressure) or as a percentage of system airflow. This provides an objective measure for comparison to standards and a baseline for planning the sealing work.
Thermal Imaging. Thermal imaging during system operation can identify leakage points by temperature anomalies. Return leaks show as hot spots where attic air enters the duct system; supply leaks show as cold spots where conditioned air escapes the duct system.
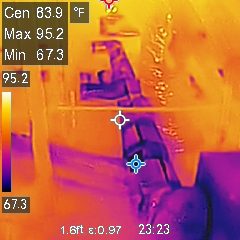
At Knights of the Attic, we use each of these techniques to identify the source of duct leakage in your system and propose multiple options to correct this issue in your home.
What NOT to Do
Certain responses to duct leakage problems are ineffective or counterproductive.
- Do not assume the problem is low refrigerant charge. Return duct leakage creates symptoms similar to undercharge: warm supply air, long runtime, elevated head pressure. Adding refrigerant does not fix duct leakage and may result in overcharge once leakage is corrected.
- Do not seal only the leaks you can easily see. Significant leakage often occurs at hidden connections, especially at the return plenum and equipment cabinet. Comprehensive sealing requires access to these critical areas or methods that can seal the leaks remotely.
- Do not use cloth duct tape for repairs. Cloth duct tape fails rapidly in attic conditions. The adhesive releases within months to a few years. Use Insulated Duct Armor™, Aeroseal, mastic or UL-listed foil tape for permanent repairs that will last the life of the duct system.
- Do not assume new equipment will solve the problem. Duct leakage affects system performance regardless of equipment age or efficiency rating. New equipment connected to leaky ducts will underperform just like old equipment did.
References
- ¹ Building Science Corporation. BSI-074: Duct Dynasty: https://buildingscience.com/documents/insights/bsi-074-duct-dynasty
- ² ACCA Manual J. Air Conditioning Contractors of America.
- ³ ASHRAE Standard 193: Method of Test for Determining the Airtightness of HVAC Equipment. https://webstore.ansi.org/standards/ashrae/ansiashrae1932010r2024. Also referenced by International Code Council: https://shop.iccsafe.org/media/wysiwyg/material/8950P825-sample.pdf
- ⁴ DOE Building America Solutions Center. Ducted Returns: https://basc.pnnl.gov/resource-guides/ducted-returns
- ⁵ DOE Building America Solutions Center. Duct Sealing and Insulation: https://basc.pnnl.gov/home-improvement-expert/checklists/duct-sealing-and-insulation
- ⁶ DOE Building America Solutions Center. Sealed and Insulated Metal Ducts: https://basc.pnnl.gov/resource-guides/sealed-and-insulated-metal-ducts
- ⁷ DOE Building America Solutions Center. Sealing Duct Boots to Floor or Drywall: https://basc.pnnl.gov/resource-guides/sealing-duct-boots-floor-or-drywall
- ⁸ DOE Building America Solutions Center. Air Seal HVAC Cabinet Seams: https://basc.pnnl.gov/resource-guides/air-seal-hvac-cabinet-seams
- ⁹ Energy Star. Duct Sealing: https://www.energystar.gov/saveathome/heating-cooling/duct-sealing
- ¹⁰ Building Science Corporation. Info-603: Duct Sealing: https://buildingscience.com/documents/information-sheets/information-sheet-duct-sealing
Solution: Click here to learn about solutions to this problem.


